


Dokumentation
Ose_directory e-shot
2642 Visninger •Checkline II maintenance manual
3010 Visninger •Chemsplash Pro WD40 Test
2368 Visninger •Ergonomi 2006
2908 Visninger •Ose_directory Suspension harness
2681 Visninger •Procurement Guide annonce Health and Safety International - Europe's magazine for employee protection and personal protective equipment
3373 Visninger •Demonstration af velcro strop til montering/påsætning af gasdetektor på faldsikringssele
3148 Visninger •VISOR Installation steps
3935 Visninger •Desinfektionsprodukter med effekt på Coronavirus 2019-nCoV
2927 Visninger •Hearing protection 3M
2481 Visninger •Statistik for arbejdsmiljø 2014
2933 Visninger •LOTO_GuideBook_Europe_English
2483 Visninger •Remote area lighting system
2254 Visninger •Isol8 - The Ultimate Absorbent for Spills
2265 Visninger •Magazine Arbejdsmiljø - november 2012
2431 Visninger •KEE_DOME_MINI
2334 Visninger •TDS Speedglas 9100
2522 Visninger •The Pocketbook of Lean Visuals
2517 Visninger •Instructional video Sign holder
1810 Visninger •PREMARK installation manual
2472 Visninger •D-S CSR Håndbog
16782 Visninger •Find handskestørrelse - størrelsesguide for handsker
9855 Visninger •3M jupiter manual
6020 Visninger •9100 Manual
4893 Visninger •EN 388 nye mærkninger forklaring
4667 Visninger •D-S 70 års om os brochure
4627 Visninger •Forklaring af den nye EN ISO 374 kemikalier norm
4566 Visninger •Faldsikring flyer
4089 Visninger •Hvordan du kalibrere en 3M Jupiter luftstrøms enhed
3953 Visninger •VISOR Installation steps
3935 Visninger •Guide til valg af åndedrætsværn
3482 Visninger •TR-300 Bruger manual
3464 Visninger •VARMEX 2000 Fordele
3423 Visninger •Procurement Guide annonce Health and Safety International - Europe's magazine for employee protection and personal protective equipment
3373 Visninger •3M TR 300 PAPR training video
3324 Visninger •Demonstration af velcro strop til montering/påsætning af gasdetektor på faldsikringssele
3148 Visninger •Procedure for iklædning af engangsbeklædning
3123 Visninger •3020 Solcreme SPF 30 datablad
3106 Visninger •3M 8825+ 8835+ 06936+ 1895V+ BSI CE-Cert_(CE_705688_(Iss_30_09_2019))
3096 Visninger •Aura_Gen_3_BSI_Cert_(CE_681745_(Iss_07_10_2019)
3060 Visninger •GotchaRescueSystem
| Visninger | |
|---|---|
| 539 | Totale visninger |
| 0 | Medlemmer visninger |
| 539 | Offentlige visninger |
Del via email
Venligst login for at dele dette document via email.
Indlejr på din hjemmeside
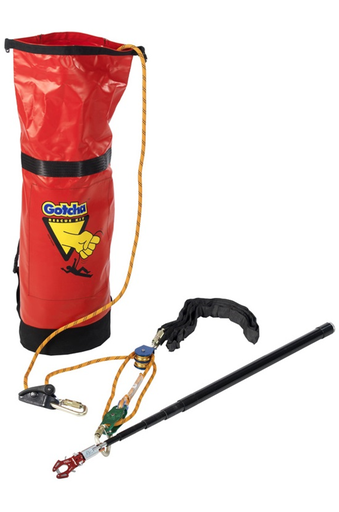
1. P&P Safety Limited 131 New John Street, Aston, Birmingham B6 4LD England Tel: +44 (0) 121 359 4561 (Sales) Fax: +44 (0) 121 359 4136 website: www.ppsafety.co.uk email: sales@ppsafety.co.uk Registered in England No. 01493537 P& P “GOTCHA ™ ” RESCUE SYSTEM USERS OPERATING INSTRUCTIONS The idea of the “GOTCHA™” is to provide a rescue kit that will enable a rescuer to: • Attach a casualty who is suspended by a fall arrest lanyard. • Raise the casualty in order to release their current lanyard. • Raise or lower the casualty to a point of safety. V3 0916 The above capabilities are all achievable without the need for the rescuer to access the casualty. In order to carry out this, the rescuer must be able to access the point at which the casualty anchored their lanyard. The control feature of the rescue kit locks automatically if released. The “GOTCHA™” will be used in two different modes depending upon whether the anchor point is at the rescuers foot level or above (above being 1.5m above to have any material effect), as this has important effects. If the anchor is at foot level, then the system will not be able to raise the casualty sufficiently to bring them back to their start point. The casualty must be raised in order to release their lanyard, then lowered to safety. Also the rescuer is required to use their strength when raising the casualty, so the mechanical advantage is greater. (4:1) If the anchor is 1.5m above foot level, preferably at head height, it will be possible to raise the casualty to their start point. For this the rescuer is able to use their weight to assist in the operation and therefore the mechanical advantage is lower. (3:1)
4. Keep these instructions or a copy with the “GOTCHA™” to aid future inspection, and examination. The equipment must be given a visual and tactile inspection when delivered to site/works, and before every use. Pammenter & Petrie Limited recommends recorded inspection by a competent person every 6 months. Particular attention should be paid to the following: Metal - ware - Inspect for signs of damage / distortion / corrosion, and correct operation and locking of connectors. Rope* - Examine for any signs of wear / abrasion, including interstrand wear, unravelling, extension and fusion. * Local abrasion as distinct from general wear may be caused by the passage of the rope over sharp edges or protrusions while under tension and may cause serious loss of strength. Slight damage to outer fibres and occasional yarn may be considered harmless, but any reduction in diameter of the rope or serious distortion to the sheath pattern should lead to rejection. All Personal Protective Equipment should be immediately removed from service after being subjected to any shock, or if there is any doubt about its condition, (See list above). The “GOTCHA™” may be cleaned if required. The following procedure must be adhered to. Use a mild detergent with hand hot water, using a cloth or sponge to wipe the “GOTCHA™” and avoid over wetting. This procedure should then be repeated with clean water to rinse, then allow to dry naturally away from a direct heat source. If you require more information, please contact Pammenter & Petrie Limited. All equipment should be stored and transported in the following manner: • To prevent contact with sharp objects. • Away from harmful substances. • In a cool dry place free from direct sunlight. P&P Safety Limited offers training either on site or at another suitable training venue, in all aspects of height safety. Courses are certificated and issued on successful completion. Although it is not compulsory, for the safety of all users P & P Safety Limited recommends you take advantage of this training service, please contact us for further details. P&P Safety Limited 131 New John Street, Aston, Birmingham B6 4LD England Tel: +44 (0) 121 359 4561 (Sales) Fax: +44 (0) 121 359 4136 website: www.ppsafety.co.uk email: sales@ppsafety.co.uk Registered in England No. 014935 37 INSPECTION AND EXAMINATION P&P SAFETY TRAINING
2. INSTALLATION & USE: INSTRUCTIONS Anchorage more than 1.5m above foot level. 1. Access casualty’s anchorage point. 2. Attach the anchor sling to a suitable anchor point above the casualty. 3. The rescuer’s weight is used to assist in the operation. The double pulley (blue) is clipped to the anchor sling. 4. Adjust pole to the required length. 5. Attach the red clip to the end of the pole, and clip the single pulley into the webbing. 6. Adjust ropes in - between the pulleys to the same length as the pole. 7. Set the red clip to open. 8. Using the pole, attach the red clip to the casualty’s harness attachment. 9. Remove the pole from the red clip. 10. Attach the GRIGRI to the rescuer’s harness. 11. Pull the slack rope through the GRIGRI to tension the system. 12. The rescuer now sits down, thus raising the casualty. 13. With one hand, the rescuer holds the rope above the GRIGRI, close to the attachment sling. With the other hand they take in the slack rope as they stand up. 14. Once the casualty’s weight has been transferred to the “GOTCHA™”, then their lanyard can be disconnected. 15. The casualty can now be raised to a point of safety, or lowered as follows. 16. To lower the casualty, the rescuer must take hold of the rope that exists the GRIGRI, and this is used to control the descent. 17. With the other hand release the black handle on the GRIGRI until the rope can be fed at a controllable speed. This thus lowers the casualty. ( P lease see note) . HIGH ANCHOR Blue Pulley to Anchor Sling NOTE: In order to carry out a rescue, the rescuer requires a harness with a front point of attachment for locating the GRIGRI. If the anchor point for the “GOTCHA™” is such that the casualty must be lowered, then the rope length in the kit must be four times the distance from the anchorage to the point of safety. 5 7 8 11 - 13 16 - 17
3. INSTALLATION & USE: INSTRUCTIONS Anchorage at foot level. 1. Access casualty’s anchorage point. 2. Attach the anchor sling to a suitable anchor point above the casualty. 3. The rescuer will stand to help in the operation. The single pulley (green) is clipped to the anchor sling. 4. Adjust pole to the required length. 5. Attach the red clip to the end of the pole, and clip the single pulley into the webbing. 6. Adjust ropes in - between the pulleys to the same length as the pole. 7. Set the red clip to open. 8. Using the pole, attach the red clip to the casualty’s harness attachment. 9. Remove the pole from the red clip. 10. Attach the GRIGRI to the rescuer’s harness. 11. Pull the slack rope through the GRIGRI to tension the system and squat down. 12. The rescuer now stands up, thus raising the casualty. 13. With one hand, the rescuer holds the rope below the GRIGRI, close to the attachment sling. With the other hand they take in the slack rope as they squat down. 14. Once the casualty’s weight has been transferred to the “GOTCHA™”, then their lanyard can be disconnected. 15. The casualty can now be lowered as follows. 16. To lower the casualty, the rescuer must take hold of the rope that exists the GRIGRI, and this is used to control the descent. 17. With the other hand release the black handle on the GRIGRI until the rope can be fed at a controllable speed. This thus lowers the casualty. ( P lease see note) . LOW ANCHOR Green Pulley to Anchor Sling NOTE: In order to carry out a rescue, the rescuer requires a harness with a front point of attachment for locating the GRIGRI. If the anchor point for the “GOTCHA™” is such that the casualty must be lowered, then the rope length in the kit must be four times the distance from the anchorage to the point of safety. 5 7 8 11 - 13 17
Relaterede produkter
![[23-GOTCHA-ONSITEINSTRUKS] Instruks i højderedningskit on site](/web/image/product.template/18218/image_512)
![[23-GOTCHA-INSTRUKS] Instruktion i højderedningskit via online videomøde](/web/image/product.template/18217/image_512)

To install this Web App in your iPhone/iPad press ![]() and then Add to Home Screen.
and then Add to Home Screen.
