


Dokumentation
Ose_directory e-shot
2734 Visninger •Checkline II maintenance manual
3107 Visninger •Chemsplash Pro WD40 Test
2457 Visninger •Ergonomi 2006
3036 Visninger •Ose_directory Suspension harness
2765 Visninger •Procurement Guide annonce Health and Safety International - Europe's magazine for employee protection and personal protective equipment
3472 Visninger •Demonstration af velcro strop til montering/påsætning af gasdetektor på faldsikringssele
3256 Visninger •VISOR Installation steps
4018 Visninger •Desinfektionsprodukter med effekt på Coronavirus 2019-nCoV
3011 Visninger •Hearing protection 3M
2568 Visninger •Statistik for arbejdsmiljø 2014
3039 Visninger •LOTO_GuideBook_Europe_English
2572 Visninger •Remote area lighting system
2331 Visninger •Isol8 - The Ultimate Absorbent for Spills
2336 Visninger •Magazine Arbejdsmiljø - november 2012
2517 Visninger •KEE_DOME_MINI
2432 Visninger •TDS Speedglas 9100
2605 Visninger •The Pocketbook of Lean Visuals
2595 Visninger •Instructional video Sign holder
1889 Visninger •PREMARK installation manual
2567 Visninger •D-S CSR Håndbog
17161 Visninger •Find handskestørrelse - størrelsesguide for handsker
10109 Visninger •3M jupiter manual
6205 Visninger •9100 Manual
5178 Visninger •D-S 70 års om os brochure
4802 Visninger •EN 388 nye mærkninger forklaring
4767 Visninger •Forklaring af den nye EN ISO 374 kemikalier norm
4709 Visninger •Faldsikring flyer
4422 Visninger •Hvordan du kalibrere en 3M Jupiter luftstrøms enhed
4079 Visninger •VISOR Installation steps
4018 Visninger •Guide til valg af åndedrætsværn
3615 Visninger •TR-300 Bruger manual
3577 Visninger •VARMEX 2000 Fordele
3570 Visninger •3M TR 300 PAPR training video
3475 Visninger •Procurement Guide annonce Health and Safety International - Europe's magazine for employee protection and personal protective equipment
3472 Visninger •Demonstration af velcro strop til montering/påsætning af gasdetektor på faldsikringssele
3256 Visninger •Procedure for iklædning af engangsbeklædning
3210 Visninger •3020 Solcreme SPF 30 datablad
3176 Visninger •3M 8825+ 8835+ 06936+ 1895V+ BSI CE-Cert_(CE_705688_(Iss_30_09_2019))
3167 Visninger •Aura_Gen_3_BSI_Cert_(CE_681745_(Iss_07_10_2019)
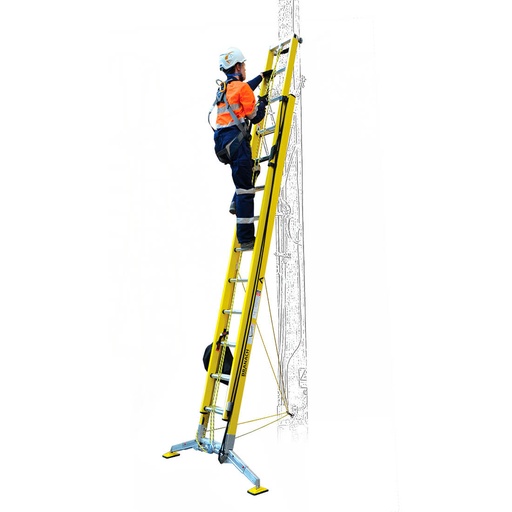
3130 Visninger •Branach-EU-Fall-Control-User-Instructions
| Visninger | |
|---|---|
| 193 | Totale visninger |
| 0 | Medlemmer visninger |
| 193 | Offentlige visninger |
Del via email
Venligst login for at dele dette document via email.
Indlejr på din hjemmeside
1. Fall Control User Instructions Procedure BP-FCL-0096-01 branach.com sales@branach.com
19. 19 Tether Zone If connecting to a ground attachment point, aim to be greater than 0.8m away from the ladder feet If connecting to a wall attachment point, aim to be within the range of 0 – 1.2m from the ground
13. 13 9. TerrainMaster Deployment Slide the leg-lock latch towards the outside of the ladder. 1 2
15. 15 12. Positioning Ladder i. Before standing ladder up check for hazards. ii. Stand ladder up against structure. iii. Extend the ladder to the final work position.
21. 21 5 6 Remove slack in life-line rope by holding the fall- arrest device under the rung hook and pulling the rope line through the fall-arrest device. If performing pole work, attach the top-lash to the pole.
11. 11 6. Initial Set Up i. Take ladder from vehicle and lay on the ground, unclip rope bag from beneath the ladder. (Check rope bag ladder size is greater than or equal to the ladder size being used) ii. Take rope from the bag with termination end in hand.
9. 9 1 2 3 Do not stand on the top 3 steps/rungs of a leaning ladder. Ensure the latch has fully engaged the rung when extending the ladder. If the latch is not parallel with the ladder, adjust so it is engaged fully. Ensure ladder is at the correct angle. To set the angle, use the angle indicator marked on the rail and/or the bubble level in the TerrainMaster base.
17. 17 14. Check Incline & Step Height 2 1 300mm +/-15mm Use level bubble to ensure ladder is at correct angle, and level to terrain accordingly. Adjust TerrainMaster wheels to ensure ladder level. Ensure there is a 300mm +/-15mm step from ground to first rung.
12. 12 7. Rope Connection to Descender Insert rope termination into descenders top RH keyhole and pull fitting around until fitting is vertically aligned with the ladder. 8. Threading Pulley i. Run rope up the right hand side and fit the life- line rope through the top pulley attachment in an anti-clockwise direction. ii. Ensure the pulley gate is closed once the rope is loaded. 1 1 2 3 2
3. 3 1. Before Use i. Ensure that you are fit enough to use a ladder and Fall Control System. ii. The user must be trained to properly fit and use a safety harness. iii. Visually check the ladder, Ropes and Fall Control devise are not damaged and are safe to use at the start of each working day. iv. For professional and domestic users, regular periodic inspection is required. v. Ensure ladder is suitable for the task. vi. Do not use a damaged ladder. vii. Before using the ladder, the user should make themselves aware of the working at height regulations applicable to their location and working environment.
22. 22 17. Rescue BEFORE YOU BEGIN – Assess the position and condition of the worker and continue with rescue procedure if safe to do so. 1 1 2 2 Firmly hold the free end of life-line rope in one hand. Then partially pull out the yellow release lever. To stop the descent, release the yellow lever. Pull the yellow release lever down to start lowering the user. Control the lowering rate by varying the speed that the rope passes through your hand. Monitor the users position and un-hook their legs as they approach the tether lines.
18. 1 4 5 2 3 18 15. Tether Setup i. Select Anchor Point: Soft ground screw, masonry anchor, pole. iia. For pole attachment, attach ladder tethers around pole or onto structure iib. For ground or masonry attachment, drill into surface, insert ground screw or masonry anchor Release tether lever on rear side of ladder and pull rope out. Extend both tethers around pole and clip together or extend tethers to other structure and clip on. Tension tethers with up to 20Kg of load on each tether. Un-clip tether hook from housing. Un-hook tether from lower hook point.
24. 65 - 75 ° 24 MANUFACTURED BY Branach Manufacturing Pty Ltd a 1/991 Mountain Highway, Boronia, Victoria 3155, Australia w branach.com Summary Ensure work area is safe Ensure fall control system is set up correctly Stable TerrainMaster Level Use level bubble Life-line Roped Correctly Secured Tethers Inspect Before Use BRANACH EUROPE e sales@branach.com.au w branacheurope.com INTERNATIONAL DISTRIBUTORS w branacheurope.com/distributors BRNC V2-19
10. 10 Fall Control Setup Ladder Glossary A Top Pulley Attachment B Rung Eyelet C Life-line Rope D TerrainMaster E Descender F Rope Termination G Camp Rope Grab H 3 Lock Carabiner I Work Positioning Hook J Tethers A B C D E F G H I J
20. 20 16. Attach Harness onto Fall Arrest Device 1 3 2 4 Un-clip work position hook from life-line rope. IMPORTANT! Test the system before climbing the ladder by rocking ladder to ensure tethers are tensioned and sitting in the harness from the life-line rope via the fall- arrest device. Attach chest harness point to fall-arrest device. Never connect to the fall-arrest device via a lanyard or shock pack as this will increase fall distances and overload the ladder system. The maximum gap between the users’ chest and the fall-arrest device should be 30cm. Ascend ladder, once the desired work height on the ladder has been reached, attach the work positioning hook to a rung eyelet above the harness attachment point. Place hook above eyelet and twist in.
8. 8 5. Using the Ladder (continued) Do not use the ladder on an unfirm or unstable base. Do not exceed the level the TerrainMaster can operate in (15° Slope). Use the built-in level bubble or spirit level to ensure the ladder steps are level. If you are not sure, STOP. DO NOT RISK YOUR SAFETY. Do not overreach. Keep your belt- buckle/navel inside the rails and both feet on the same step/rung throughout the task. O IL 0 H 2 Do not erect ladder on heavily contaminated ground. 75 65 - ° Use the leaning ladder at the correct angle. To judge the angle, use the angle indicator marked on the rail and/or the bubble level in the TerrainMaster base. Leaning ladders with steps shall be used so that the steps are in a level horizontal position. m i n . 1 m Ladders used for access to a higher level shall be extended at least 1metre (1m) above the landing point and secured if necessary. U P Only use the ladder in the direction indicated. Do not lean the ladder against unsuitable surfaces. For pole work use a Branach Pole Strap or Pole Chain combined with a Top Lash.
5. 5 3. Ladder System Guidelines m ax. 15 0 k g i. The maximum total load for the ladder without fall control option is 150kg.Including tools and equipment m ax. 12 0 k g ii. The maximum load of the system may be limited by the rating on the harness. The maximum load of the system for the ladder with fall control option is 120kg. The fall control devise supplied with this system is rated to 120kg. iii. System must always be tethered to prevent the risk of ladder slip back. iv. If using the ladder for pole work, the top lash must always be secured around the pole. v. TerrainMaster legs must always be deployed to their widest position allowing for 300mm +/- 15mm step height to ground. vi. Before doing any work from the ladder, the user must attach the work positioning hook to the nearest rung eyelet to constrain the rope line. vii. If transitioning from the ladder system to a pole strap, a work procedure must cover this process. viii. DO NOT USE A LANYARD BETWEEN HARNESS AND ROPE GRAB
6. 6 i. The ladder shall be fully extended with the rungs or treads level with the ground. ii. The ladder must be erected on a firm, unmovable surface with a maximum gradient of 15°. iii. When positioning the ladder take into account the risk of collision with the ladder, e.g. from pedestrians, vehicles or doors. iv. Identify any electrical risks in the work area, such as overhead lines or other exposed electrical equipment. v. The ladder should be stood on both feet; not supported on the rungs or steps. vi. Ladders shall not be positioned on slippery surfaces (such as ice, shiny surfaces or significantly contaminated solid surfaces) unless additional effective measured are taken to prevent the ladder slipping or ensuring contaminated surfaces are sufficiently clean. vii. It is recommended that the ladder is positioned at the correct working angle of 75°. To ensure correct angle, use the angle indicator marked on the rail and/or the level-bubble in the TerrainMaster base. This position is often referred to the 4:1 rule where the feet of the ladder are one unit out from the vertical contact surface for every 4 units measured vertically to the point of contact of the ladder to the vertical surface. 4. Positioning and Erecting the Ladder
23. 23 18. Storage / Care i. Disconnect tether system from structure and store back on ladder, tensioning tethers so ropes are not loose. ii. Remove the life-line rope using the release lever to remove any tension in the rope and store rope in provided rope bag. iii. Attach rope bag to ladder or store in vehicle. iv. It is recommended that Ladders be stored away from direct sunlight, excessive heat, dampness or exposure to the elements. v. Store the ladder in a safe place where it cannot be damaged by vehicles, heavy objects or contaminants. vi. Store the ladder so it does not become a trip hazard or obstruction. vii. Store the ladder securely so that it cannot fall and injure people. viii. When storing ladders give consideration for preventing use by criminals for gaining unauthorised access and ensure children and the general public cannot climb the ladder. ix. Repairs and maintenance shall be carried out by a competent person who has been qualified by Branach and shall be in accordance with Branach’s instructions and procedures. Only use Branach recommended components and fasteners.
2. 2 These user instructions cover the following Branach products classified as for Professional use according to EN131-2; FEU 3.9 to 8.7 Extension Ladder Combined with FC: European Fall Control option. This product utilises a C.A.M.P S.P.A. BLIN KIT - Ref.256502 which is in conformity with the provisions of Council Directive 89/686/EEC and with the EN 353-2:2002 standard. The user must read the Branach User Instructions and the CAMP instruction set provided with the system. The distributor of this ladder must ensure that these instructions are provided with each ladder with the FC Fall Control option. The owner of this ladder must ensure that these instructions are available to the user of the ladder. User Instructions The user of the ladder must refer to this instruction manual and the Camp instruction manual before using the ladder with Fall Control. m ax . 1 Indicates the maximum number of users allowed. The ladder is suitable for Professional Use and Domestic Use. ENSURE SAFETY HARNESS WORN BY THE USER IS IN GOOD CONDITION AND HAS A LOAD RATING TO MEET THE USERS’ WEIGHT, INCLUDING EQUIPMENT. This equipment should only be used by trained and competent person, otherwise the user should be under the direct supervision of a trained and competent person.
14. Notes: • Final adjustments to TerrainMaster will be made once ladder is erected. • Final result should be 300mm +/-15mm step height from the ground. • Screw turn wheel needs to be wound back to original position to lock the legs closed during storage. 14 10. Extend TerrainMaster i. Extend the TerrainMaster legs to their widest setting. ii. Depress the front and rear leg buttons to extend the leg. iii. Check that the lock buttons re-engage in the extended leg position. 1 2 11. Levelling i. Adjust the TerrainMaster step height to be similar to step distance. ii. Un-weight the TerrainMaster leg to remove any spring tension. iii. Wind the leg adjuster wheel until 2.5 cm (approximately) gap is formed between the latch and the adjuster wheel.
16. 1 4 7 2 5 8 3 6 9 16 13. Complete Descender Roping Slide thumb catch with arrows to right hand side. Create 20 cm of slack in the rope line, then insert rope into slot using thumb. Turn cover plate anti-clockwise back to the locked position. Unlatch yellow release lever. Turn cover plate clockwise until rope is aligned with the lower rope exit slot. Check that cover cannot rotate and has locked. Turn cover clockwise to expose rope entry slot. Pull down on rope to make sure it exits the descender. Pull down on rope from below the descender to remove slack from life-line.
4. 4 ■ Cracked or damaged Fiberglass Rails ■ Damaged or missing Steps ■ Damaged Feet ■ Damaged Rope ■ Check all rivets and bolts are in place ■ Descender device is not damaged or loose ■ Check Guide Brackets are not missing or damaged ■ Check the ladder inspection date has not been passed ■ Check that the entire ladder is free from contaminants such as dirt, oil, grease, paint, etc. ■ Check the Descender Locking Latch is working and not damaged ■ Tether Rope or fixtures are not damaged or frayed ■ Check Safety Harness is compliant 2. Inspecting the Branach Product Before Use DO NOT USE THE LADDER AND FALL DEVICE IF ALL ITEMS HAVE NOT PASSED THE INSPECTION PROCESS i. Inspect the ladder after delivery. ii. Before every use visually check the ladder is not damaged and is safe to use. If damaged, do not use the ladder. iii. The following items should be inspected as a minimum before using the system each day or after the ladder is dropped or is impacted.
7. 7 ■ Do not exceed the maximum total load for the ladder. Refer to the ladder label. ■ Do not overreach; the user should keep their belt- buckle/navel inside the rails and both feet on the same step/rung throughout the task. ■ Always use with TerrainMaster feet in an opened position. ■ Be especially cautious of wind when outside. ■ Use non-conductive ladders for unavoidable live electrical work. ■ Take precautions against children playing on the ladder. ■ Face the ladder when ascending and descending. ■ Keep a secure grip on the ladder when ascending and descending. ■ At all times maintain 3 points of contact. ■ Do not use the ladder as a bridge. ■ Wear suitable foot wear when climbing a ladder. ■ Avoid excessive side loadings e.g. drilling brick and concrete. ■ Do not spend long periods on a ladder without breaks (fatigue is a serious risk). ■ Equipment carried while using a ladder should be light and easy to handle. ■ Maintain a handhold whilst working from a ladder or take additional safety precautions if you cannot. ■ Secure the ladder to a ground or wall fixing. Secure the top of the ladder when ever possible. ■ Ensure top of the ladder makes contact with structure. Ensure structure is in good condition. ■ Do not move Ladder when standing on it. Do not move ladder from top. 5. Using the Ladder
Relaterede produkter

To install this Web App in your iPhone/iPad press ![]() and then Add to Home Screen.
and then Add to Home Screen.
